How to use FRN Client
Conditions
The Free Radio Network gives a larger range to mobile / hand held
radio users. With the program FRN Client you are able to make a
gateway station that links a local mobile / hand held radio channel
to the network. The program has to run in
 'gateway
mode' for that. If you do not have the possibility to set up your own
gateway and there is no gateway in your area, then you can use this
program in 'gateway
mode' for that. If you do not have the possibility to set up your own
gateway and there is no gateway in your area, then you can use this
program in
 'pc
only mode' in order to talk with FRN users on the network. This
software is free, but there are some rules for using this software.
These rules are made to keep the system as much fun to use it. 'pc
only mode' in order to talk with FRN users on the network. This
software is free, but there are some rules for using this software.
These rules are made to keep the system as much fun to use it.
The next points have to be observed:
- Only connect equipment
that according to the rules of your country is allowed. Connecting of
illegal equipment is at your own risk.
- Always use CTCSS or DCS
(by preference CTCSS 20), this prevents noise and unintended
transmissions from blocking the net.
- If there is another gateway
in your area, use another channel, even if you are using another net
or server.
- If you did not connect a transceiver to create a
gateway for the FRN system, then you have to run the program in
'pc
only mode'. Press and hold the 'PTT button' if you want to talk (Push
To Talk), and release this button to listen.
- Do not use abusive
language and do not block the network. If we catch you misbehaving,
your account will be blocked.
In this manual
is used where the explanation is ment for 'pc only mode' and
for explanation that is only applicable for gateway set up.
Gateway
Transceiver
How good the gateway will function depends on the used
transceiver. The following check list will help you to find a good
rig.
- CTCSS: The transceiver must have CTCSS (or DCS)
otherwise it may not be used for a gateway. Some models have a weak
CTCSS signal. Some brands have problems receiving weak CTCSS signals
and the gateway will not be heard by the owners of this models.
-
Connection for microphone and headphone: A connection for external
microphone and headphone {speakermike/headset} are needed for
connecting the transceiver to the sound card of the PC.
- External
power supply: The rig has to be able to run on an external power
supply (adapter). Many PMR transceivers have a connection for a
battery charger. Some transceivers with a connection for charger
transmit good with an external power supply, other don't.
-
Antenna: The ideal length of the antenna is 16 a 17 cm. Most rigs
have a shorter antenna. The closer the length is to 16 a 17 cm the
better the rig receives and transmits. Bigger transceivers also have
a better performance then the smaller ones.
- VOX: If you do not
use com port keying, the rig also needs a VOX on board.
-
Settings: After the external power supply is switched off and on, the
settings like channel, CTCSS and power have to be unchanged.
Steps
Take the following steps to set up your
FRN station:
STEP 1: Download
Download FRN
Client here.
STEP 2: Install FRN client
Install
this program.
STEP 3: Audio cables / interface
If using the program in PC Only mode, connect a microphone to the
microphone input on your sound card.
If you want to set up a gateway, make audio cables to connect the
PMR's speaker/headset output to the line-in on the sound card and for
connecting the sound card to the PMR's mic.-input. Have a look here
for more information on this interface.
STEP 4: Make an account
If using
FRN Client the first time, an account has to be made. Start the
program and click on 'Setting -> Identification'. A form
(Identification) will be shown that has to be filled out.
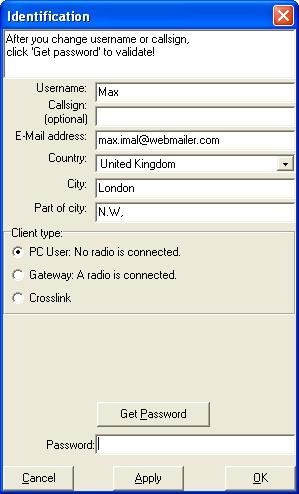
For 'PC only mode' select 'PC user'.
For a gateway select 'Gateway'. The used band, channel and squelch
system has to be selected. Most gateways make use of channel 5, 6 or
7 with CTCSS 20.
You do not know the password yet, so leave
'Password' blank for the moment. Now click on 'Get Password'. An
e-mail will be send to the address that you had filled in. In this
mail your password is given. Fill in this password in the 'Password'
field and than click on OK. You will always be able to change the
'Identification' settings by 'Setting -> Identification'. (First
disconnect)
ATTENTION: If you are off-line for a couple of months, your
account could be deleted. In this case you can not connect to any
server. If you just click on 'Get Password', Your account will be
made again, and you will get a new password. After you filled in the
new password, you will have access to FRN again.
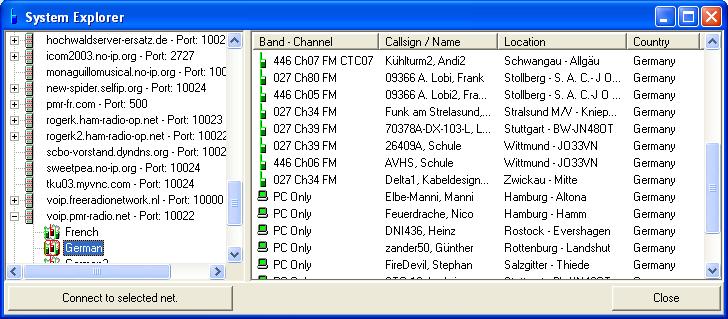
In case you get no access at all, check if you are using the
newest FRN Client version and if the server you want to connect is
on-line. You can check that with 'View -> System Explorer' and on
this website.
STEP 5: Interface
'PC only users' do not need to do this step.
Type in 'Test' in the 'Net' field and click 'Connect'.
Go to 'Settings -> Interface'.

In the 'Interface view' you define how the program and the gateway-PMR
have to react on each other.
PC to Radio: If the PMR is not driven
by the com port, select 'Use the VOX in the radio'. In that case you
have to make sure that the VOX in the PMR is switched on. Depending
on the PMR and the sound card the VOX in the PMR could interrupt
transmissions at silent moments during an over. A better method to
drive to rig is using
the interface If you have a com port interface for driving the
PMR, then you select 'Use the COM-port'. In that case you need to
define which pin is used, RTS/DTR. Active high means that the RTS/DTR
has a high voltage when the PMR have to transmit and active low means
that RTS/DTR is low when the PMR have to transmit.
Radio To PC:
These settings are for driving FRN by the PMR.
Select the com port
where the com port interface is connected to.
The Squelch
Settling Time is the time the software does not send audio to
internet after the PMR switches from transmit to receive. In that
moment a short signal comes from the PMR speaker output. This can
cause bouncing of the system. Put the Squelch Settling on 1500
ms to start with. Later on you can try to decrees this time.
The
Courtesy Delay is the time in milliseconds between the end of
an over on the local channel and the start of the roger-beep. This
time have to be as short is possible, but long enough to open the
squelch of portables using the gateway.
After al the settings are
made, this view can be closed with 'OK'.
STEP 6: Record control
Make connection with the Test net. Click on 'Settings -> Audio
Settings'. Choose the Input and Output device that you want to use
for FRN.
Select the used playback device in the tree view.
Place mute tick marks for the microphone and the line input. Select the
used record device in the tree view.
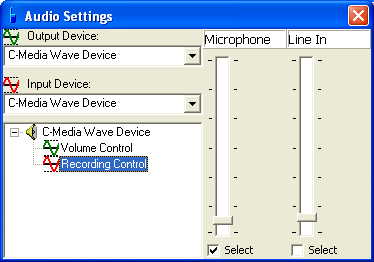
For PC only mode: Select the microphone as record device.
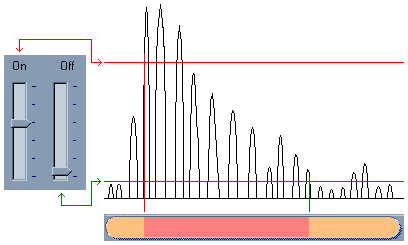
Hold down the PTT button. Talk into the microphone. The left VU-meter have to move
now. Adjust the Microphone by sliding the track up or down. The peaks
of the signal have to rise just under the maximum.
For gateways: Select the line input as record device. Set the volume
of the PMR not lower the 1/4 and not higher than 1/2 of the maximum.
Transmit with a second PMR. The left VU-meter have to move now.
Adjust the line input by sliding the track up or down and by changing
the volume of the gateway PMR. The peaks of the signal have to rise
just under the maximum.
STEP 7: Volume control
Make
connection with a net were other clients are on-line. Select the used
playback device in the tree view.
For a gateway, the volume has to be adjusted of a good modulation,
not to soft, not to loud. Use a second PMR to monitor the modulation.
The modulation can be adjusted with the 'Volume' and 'Wave' slide
bars.
| 


